The Official H-Body Internet Community
Vega, Monza, Sunbird, Astre, Starfire, Skyhawk
Fastmax's Mirage
Moderator: Moderators
42 posts
• Page 3 of 3 • 1, 2, 3
Re: Fastmax's Mirage
![]() by 72 SS PNL » Fri Jan 08, 2010 1:12 pm
by 72 SS PNL » Fri Jan 08, 2010 1:12 pm
thats gonna look GOOOOOOOOOOODDD !!!
first and best car owned 72 GT(changed to SS) panel wagon
pictures of the car from 86 - http://www.myrideisme.com/Garage/06_IBM_GOAT/955
pictures of the car from 86 - http://www.myrideisme.com/Garage/06_IBM_GOAT/955
-

72 SS PNL - Posts: 2716
- Joined: Sat Mar 14, 2009 1:18 am
- Location: phx az
1973 Chevrolet Vega Kammback GT
Re: Fastmax's Mirage
![]() by Fastmax32168 » Sat Feb 20, 2010 9:16 pm
by Fastmax32168 » Sat Feb 20, 2010 9:16 pm
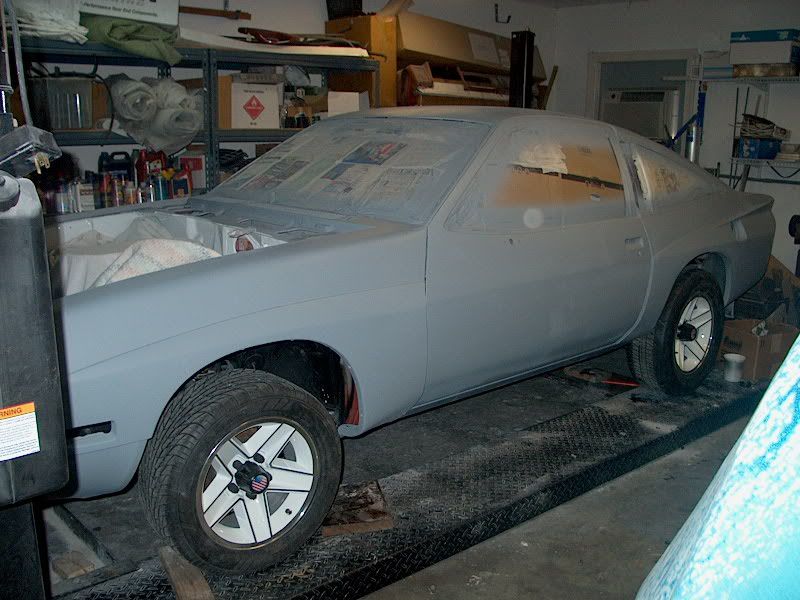
Well I got her primed and blocked once, and now the 2nd coat of prime is on. I am going to let it set up a couple of weeks before I block it down again. Hopefully that will be the last time, but I wont know until I sand it.
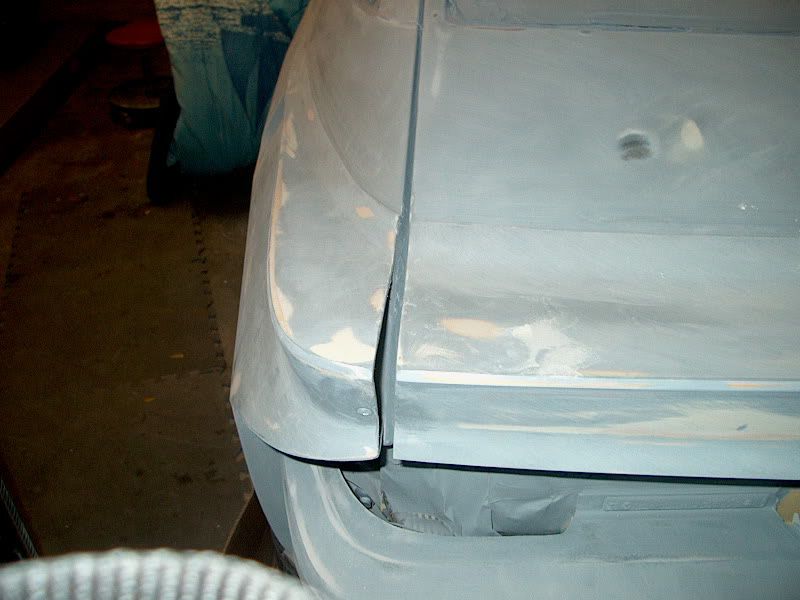
Here is an example of the kind of poor fitting body panels we have to contend with on these cars. It is hard for me to believe that in the 70s we were actually willing to accept this on a brand new car. Check out the mismatch on the rear spoiler. I just couldn't live with it
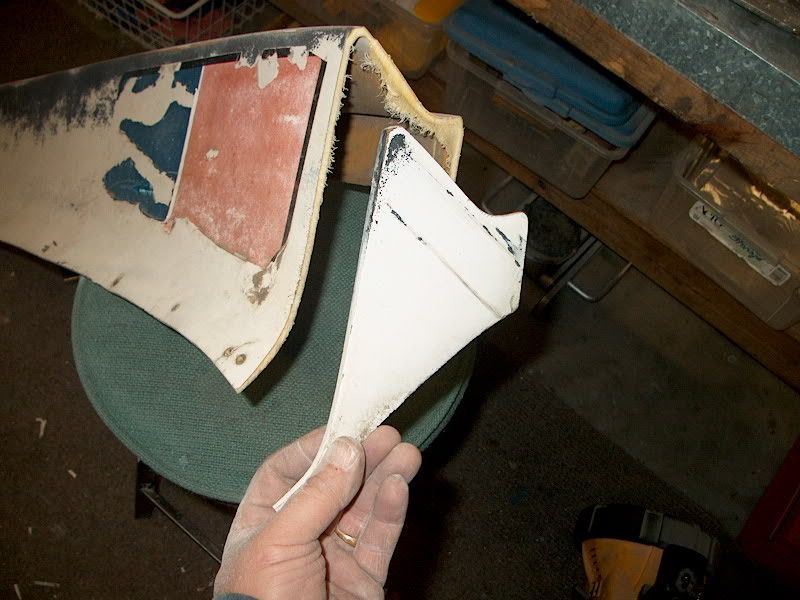
How am I going to build it up though? Where can I get a piece of plastic that is compatible and also a perfect fit. Okay time for the collective H-body groan. But hey, that's what spare parts are for, besides I have already cut parts out of several of my spares in order to get the set I am using right.
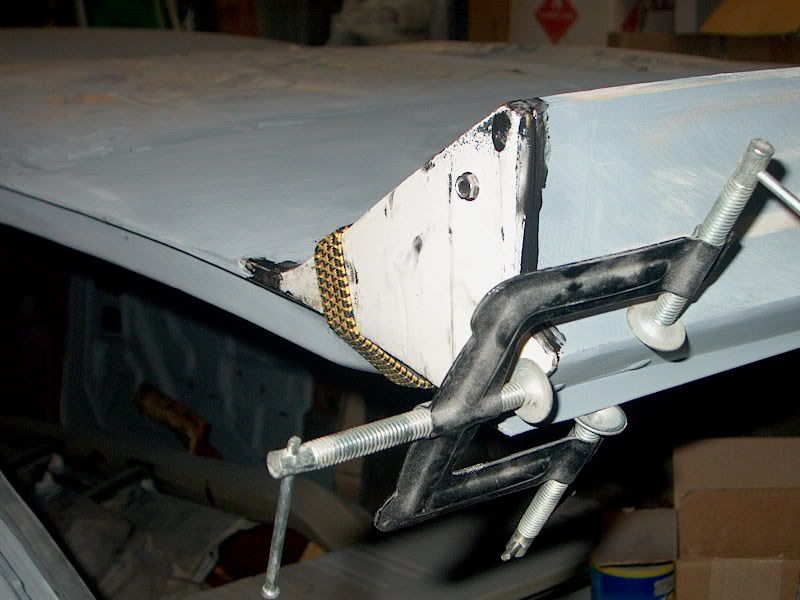
Some creative clamping once again required.
Not quite finished, but it is going to be much much better.

Here is an example of the kind of poor fitting body panels we have to contend with on these cars. It is hard for me to believe that in the 70s we were actually willing to accept this on a brand new car. Check out the mismatch on the rear spoiler. I just couldn't live with it
How am I going to build it up though? Where can I get a piece of plastic that is compatible and also a perfect fit. Okay time for the collective H-body groan. But hey, that's what spare parts are for, besides I have already cut parts out of several of my spares in order to get the set I am using right.
Some creative clamping once again required.
Not quite finished, but it is going to be much much better.
80 Monza Cabriolet coupe
94 Corvette Convertible LT-1 500+ HP
Trailblazer EXT LS6 powered
1991 K1500 6.0 LS swapped
94 Corvette Convertible LT-1 500+ HP
Trailblazer EXT LS6 powered
1991 K1500 6.0 LS swapped
- Fastmax32168
- Posts: 945
- Joined: Mon Jun 26, 2006 7:56 am
- Location: Port Orange Fl
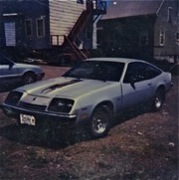
1977 Chevrolet Monza Mirage
Re: Fastmax's Mirage
![]() by 72 SS PNL » Sun Feb 21, 2010 2:19 am
by 72 SS PNL » Sun Feb 21, 2010 2:19 am
looks alot better with the gap closed up
first and best car owned 72 GT(changed to SS) panel wagon
pictures of the car from 86 - http://www.myrideisme.com/Garage/06_IBM_GOAT/955
pictures of the car from 86 - http://www.myrideisme.com/Garage/06_IBM_GOAT/955
-
72 SS PNL - Posts: 2716
- Joined: Sat Mar 14, 2009 1:18 am
- Location: phx az
1973 Chevrolet Vega Kammback GT
Re: Fastmax's Mirage
![]() by spyderhunter » Sun Aug 14, 2011 9:32 pm
by spyderhunter » Sun Aug 14, 2011 9:32 pm
Im glad to see someone else putting the extra effort into their build. I know most of you do, but it's easy to take short cuts especially with a white car. And to put that extra care into a restoration that usually far exceeds the value of the car means that I'm not crazy all by myself! Nice work on the body and flare panels. I'm almost ready to start on fitting my panels and was wondering about bonding them to the car also. Looks like it's gonna work great! Thanks for the tips on heating the panels to coax them back to shape. I was going to try it, but didn't know if it would work for sure. Your Mirage is a little ahead of mine, but you give me some inspiration to keep going the extra mile. See you in the car shows someday.
-
spyderhunter - Posts: 158
- Joined: Fri Feb 11, 2011 5:50 pm
- Location: Bucksport, Maine
Re: Fastmax's Mirage
![]() by cjbiagi » Sun Aug 14, 2011 10:00 pm
by cjbiagi » Sun Aug 14, 2011 10:00 pm
Paying attention to details is what separates the top notch cars from the "drivers". I also like to see people taking the time and effort into making things right, not just living with what's there. I had to finesse my front urethane sections where they meet the fender. There were some serious indentations on them and I couldn't live that either. People told me there wasn't anything I could do but I repaired them many years ago and they have been holding up fine. You can't block block a car too many times, it just keeps getting better with each block sanding session. Keep the pics coming, it's looking real good.
Clyde.........75 Monza 2+2
-

cjbiagi - Posts: 8612
- Joined: Sun Jun 25, 2006 2:37 pm
- Location: Glenwood, Illinois
1975 Chevrolet Monza
Re: Fastmax's Mirage
![]() by Fastmax32168 » Mon Aug 22, 2011 5:52 pm
by Fastmax32168 » Mon Aug 22, 2011 5:52 pm
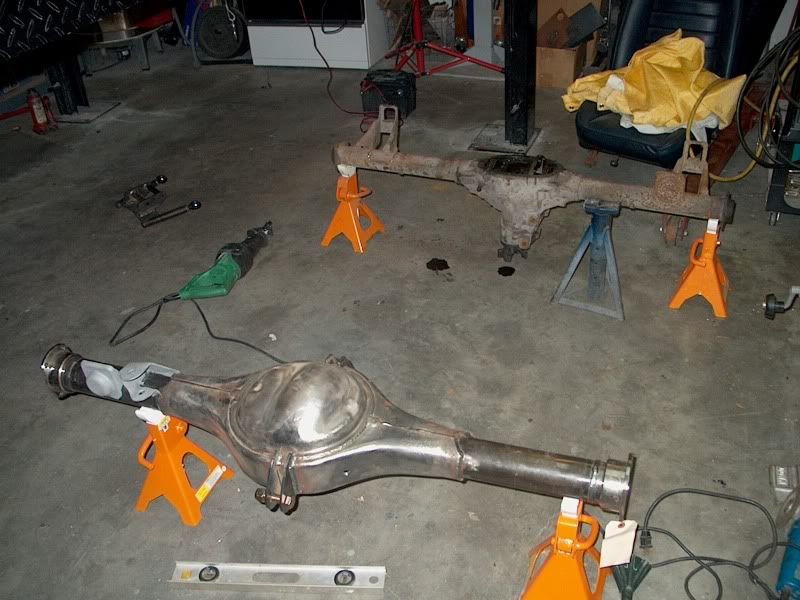
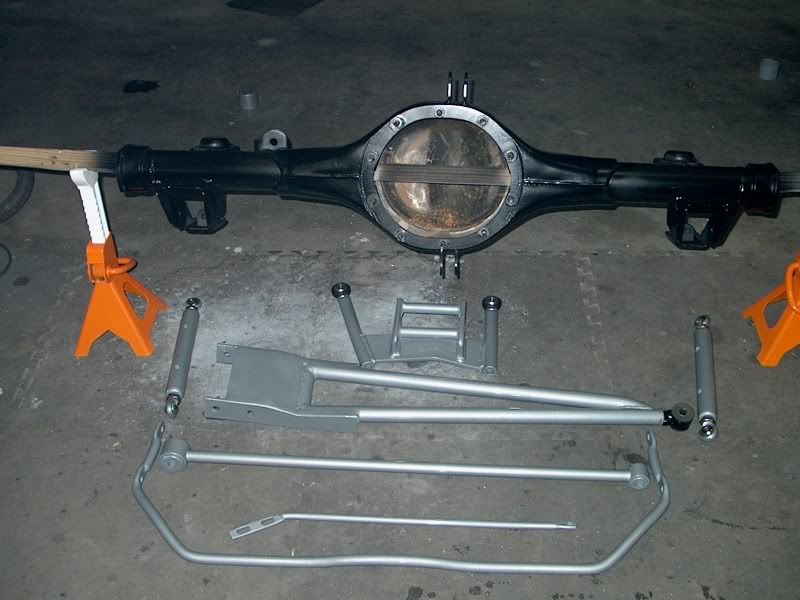
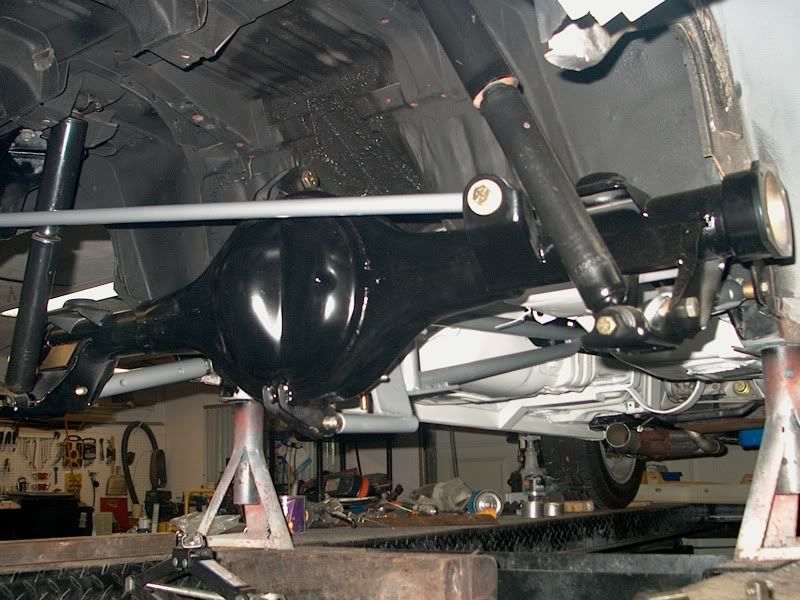
Thanks for the kind words all. I have gotten back to work on this car recently. I decided to go all out on the rear axle rather than worrying about breaking it every time I stomp down on the throttle. I started off by buying a bare ford 9" rear from quick performance with nothing but an F-body style torque arm mount installed.
Here is a photo of it having the Monza brackets transferred over. Getting these cut off the old rear, lined up properly, and welded back on was a full 2 days work.

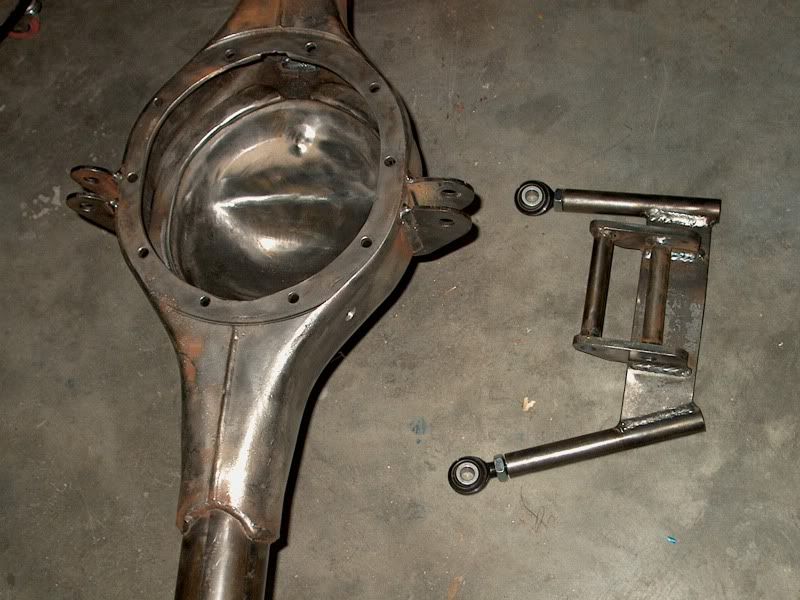
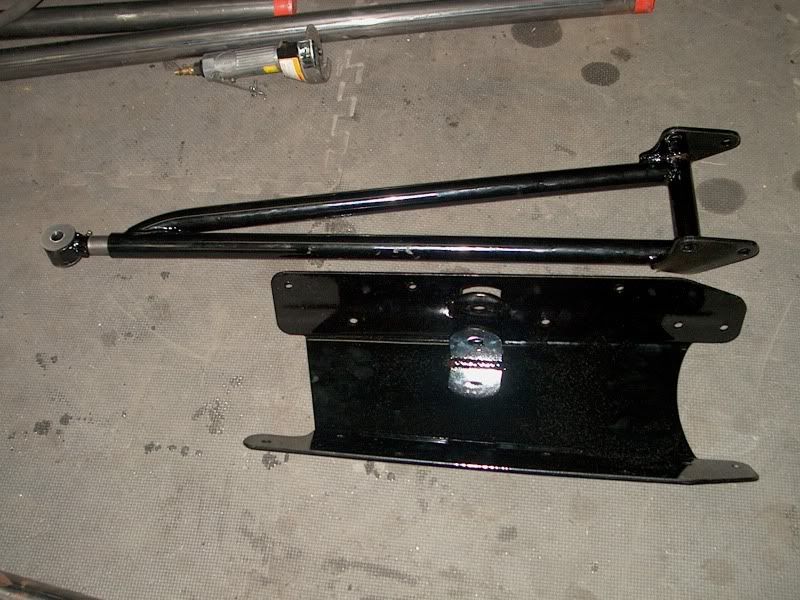
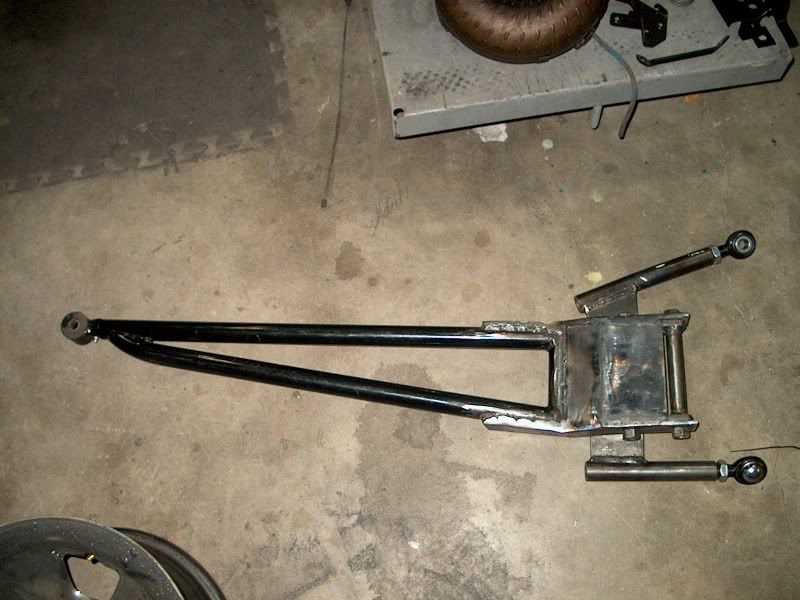
This is what the F-body style torque arm mount looks like.
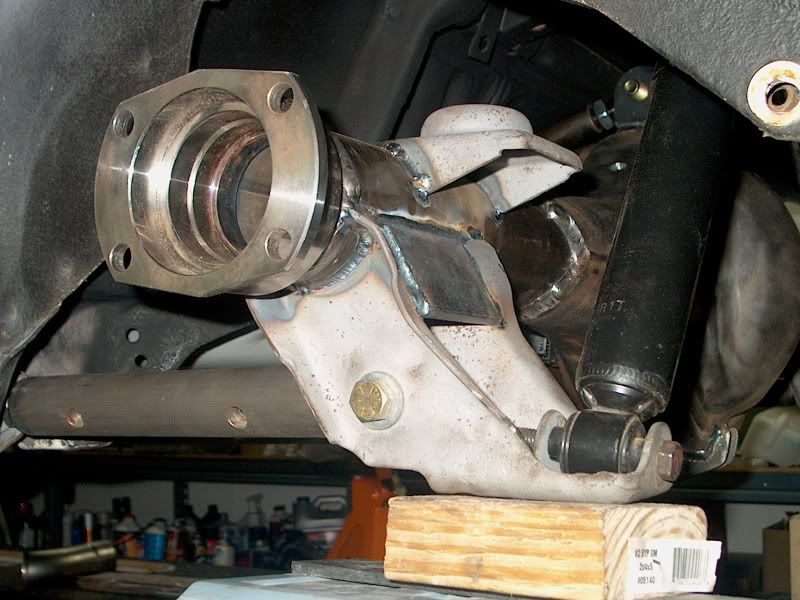
Here is a photo of the brackets all welded in and the rear bolted into the car. I made some reinforcements for the brackets as I am sure they were never meant for this kind of HP.
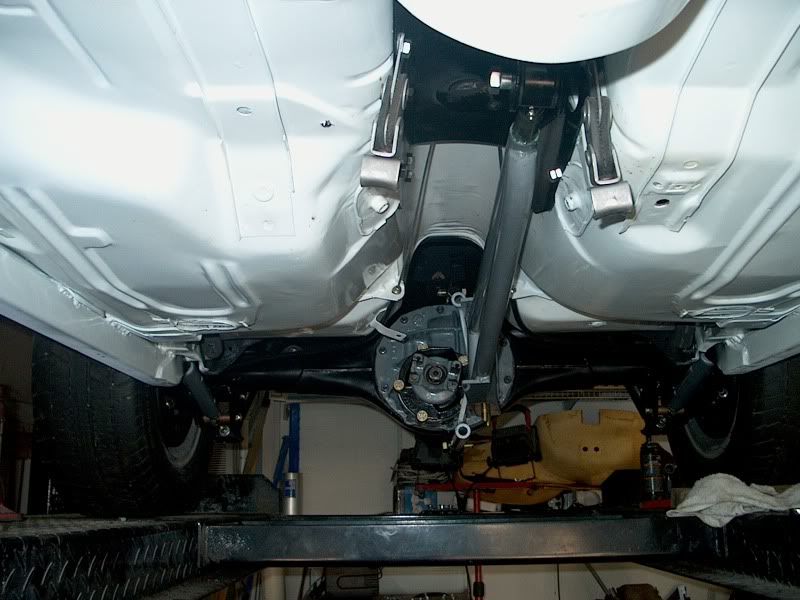
I had intended to use a Jegster F-body torque arm on the car. The Jegster arm is shorter than a factory arm, much beefier, and mounts into the tunnel. It hits the tires much harder on launch than the long rubber mounted bendable item GM gave us. Here is a pic of the Jegster arm as delivered. Unfortunately the tunnel mount was way too wide, and the mounting point being off to the side made it impossible to mount up without major mods to the floor. The Camaro obviously has a much wider tunnel area to accommodate this.
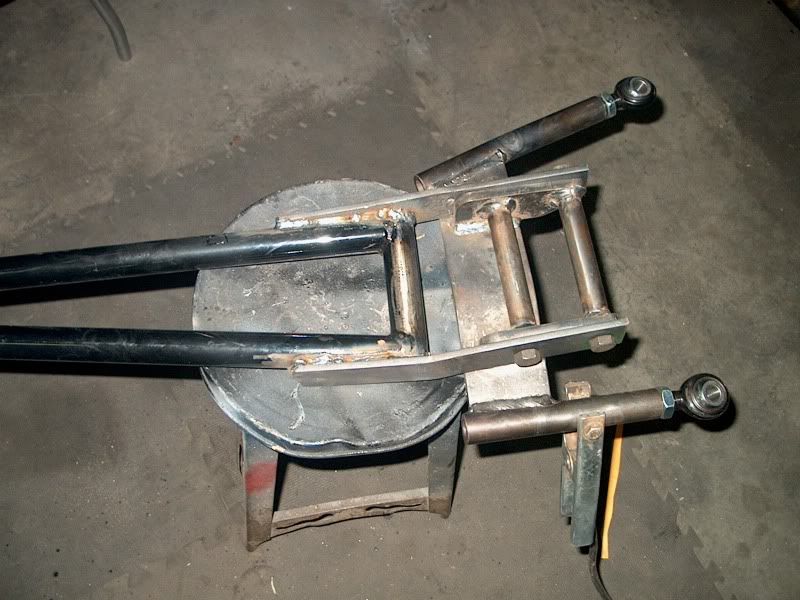
The width at the top of the saddle was OK but In order to get the mount into the tunnel I had to split it about 1/2 way through along its length. I was then able to bend it so it was thinner at the bottom. After bending it so that it fit the tunnel like a glove I welded it back up along the seam I had cut.
After spending about 1/2 the day getting the rear positioned as accurately as I figured ride height would be, I used 2 pieces of strap steel to move the mount from the side of the arm to the rear. Getting everything lined up and at all the right angles before tacking these in place turned out to be the hard part.
OK so I got a little carried away with the bracing, but its not going anywhere!
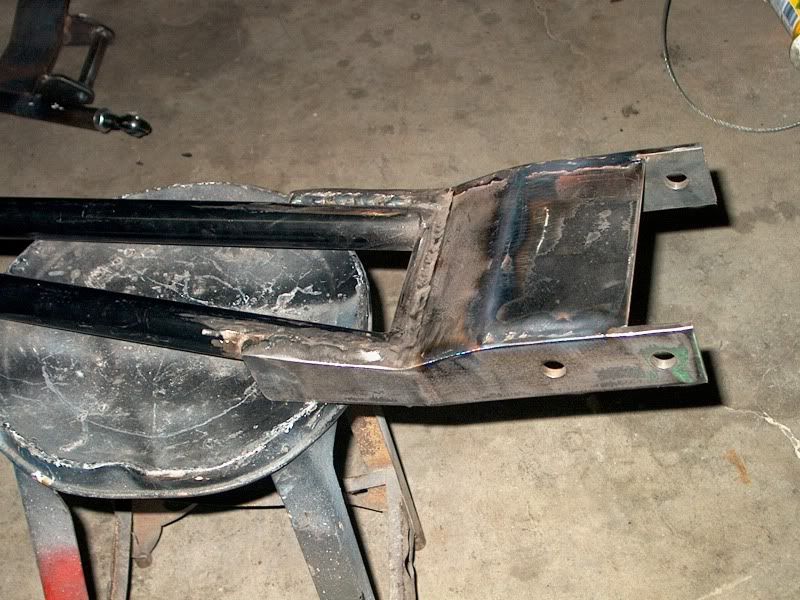
Bolted up to the torque arm mount. Note how the offset built into the mount now moves the arm in front of the mounting point rather than off to the side of it.
And in it all goes!
It will need some cleanup and detail work when I pull it all back out, but it all fits great!
I am currently mocking up the exhaust now that I have the rear in and know what has to clear where. I will post that voyage next, it turned out to be another entire quest.
Here is a photo of it having the Monza brackets transferred over. Getting these cut off the old rear, lined up properly, and welded back on was a full 2 days work.
This is what the F-body style torque arm mount looks like.
Here is a photo of the brackets all welded in and the rear bolted into the car. I made some reinforcements for the brackets as I am sure they were never meant for this kind of HP.
I had intended to use a Jegster F-body torque arm on the car. The Jegster arm is shorter than a factory arm, much beefier, and mounts into the tunnel. It hits the tires much harder on launch than the long rubber mounted bendable item GM gave us. Here is a pic of the Jegster arm as delivered. Unfortunately the tunnel mount was way too wide, and the mounting point being off to the side made it impossible to mount up without major mods to the floor. The Camaro obviously has a much wider tunnel area to accommodate this.
The width at the top of the saddle was OK but In order to get the mount into the tunnel I had to split it about 1/2 way through along its length. I was then able to bend it so it was thinner at the bottom. After bending it so that it fit the tunnel like a glove I welded it back up along the seam I had cut.
After spending about 1/2 the day getting the rear positioned as accurately as I figured ride height would be, I used 2 pieces of strap steel to move the mount from the side of the arm to the rear. Getting everything lined up and at all the right angles before tacking these in place turned out to be the hard part.
OK so I got a little carried away with the bracing, but its not going anywhere!
Bolted up to the torque arm mount. Note how the offset built into the mount now moves the arm in front of the mounting point rather than off to the side of it.
And in it all goes!
It will need some cleanup and detail work when I pull it all back out, but it all fits great!
I am currently mocking up the exhaust now that I have the rear in and know what has to clear where. I will post that voyage next, it turned out to be another entire quest.
80 Monza Cabriolet coupe
94 Corvette Convertible LT-1 500+ HP
Trailblazer EXT LS6 powered
1991 K1500 6.0 LS swapped
94 Corvette Convertible LT-1 500+ HP
Trailblazer EXT LS6 powered
1991 K1500 6.0 LS swapped
- Fastmax32168
- Posts: 945
- Joined: Mon Jun 26, 2006 7:56 am
- Location: Port Orange Fl
1977 Chevrolet Monza Mirage
Re: Fastmax's Mirage
![]() by stage169 » Mon Aug 22, 2011 6:34 pm
by stage169 » Mon Aug 22, 2011 6:34 pm
That is really nice! I like your TA solution and the rest of the car! Brian
-

stage169 - Posts: 1751
- Joined: Tue Jun 27, 2006 11:43 pm
Re: Fastmax's Mirage
![]() by Fastmax32168 » Sun Sep 11, 2011 5:26 pm
by Fastmax32168 » Sun Sep 11, 2011 5:26 pm
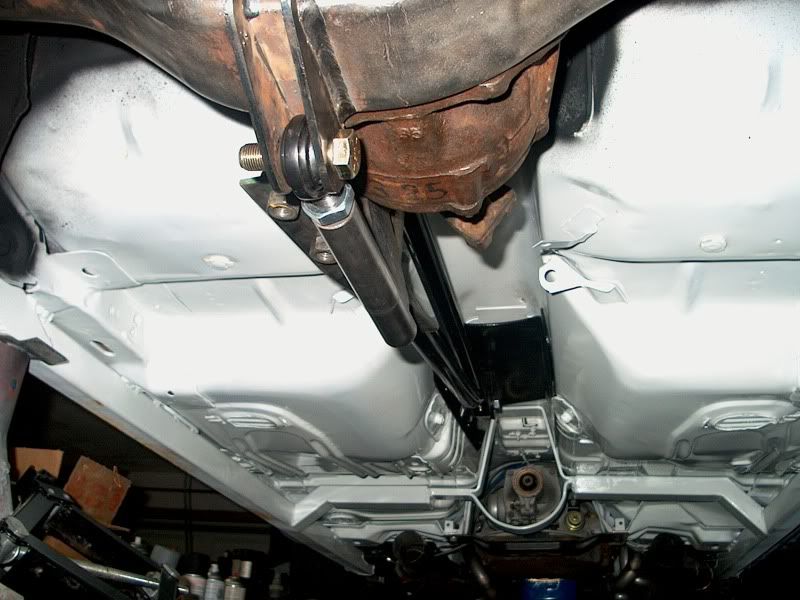
Got all of the suspension components and rear painted and ready to put in.
I discovered there was a problem at full compression with the torque arm mount hitting the tunnel. This could be a problem if you wanted to run a back seat. Personally I think my chances of convincing more than one person at once to get into this car with me when it is done are going to make one unnecessary!
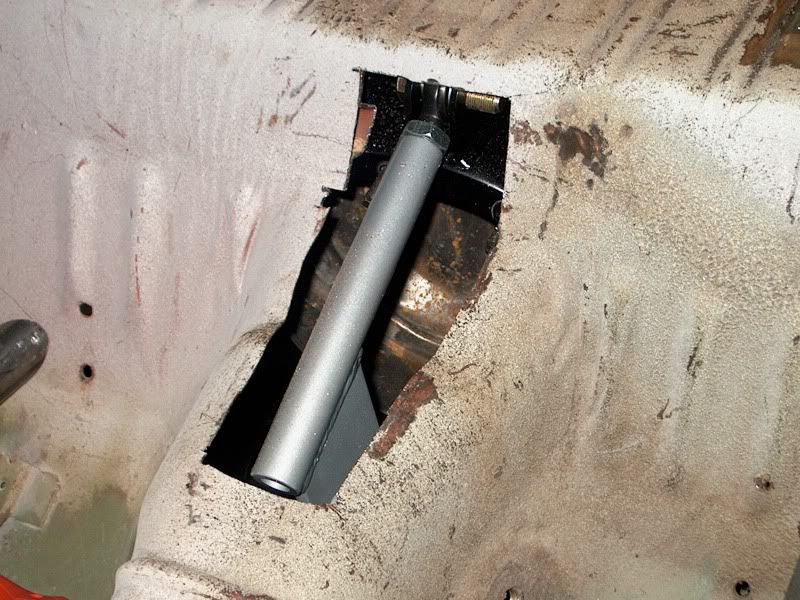
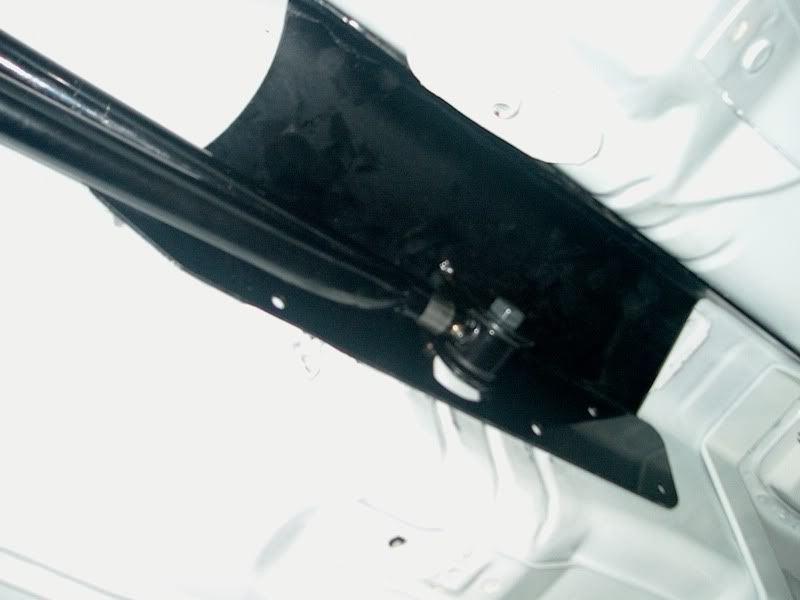
Here is the finished relief for the torque arm and you can see the roll bar I have been working on. Definitely no back seat now!
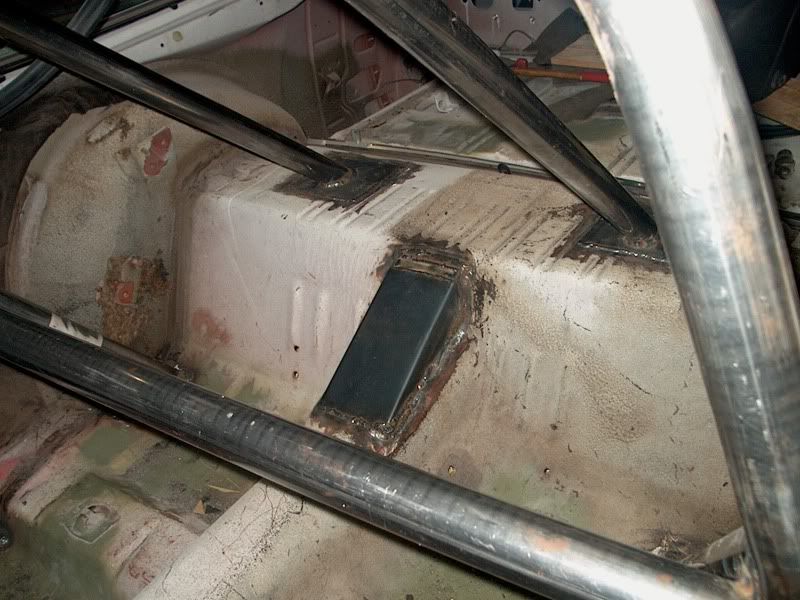
I had to make a spacer so that the emergency brake would clear the torque arm mounting plate. You can see where I ran a bar from the cage to directly on top of the mounting plate itself.
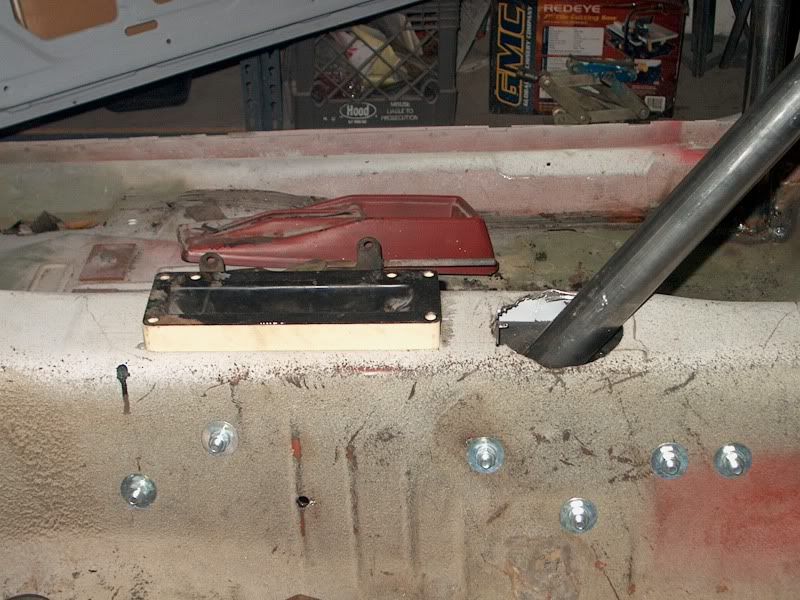
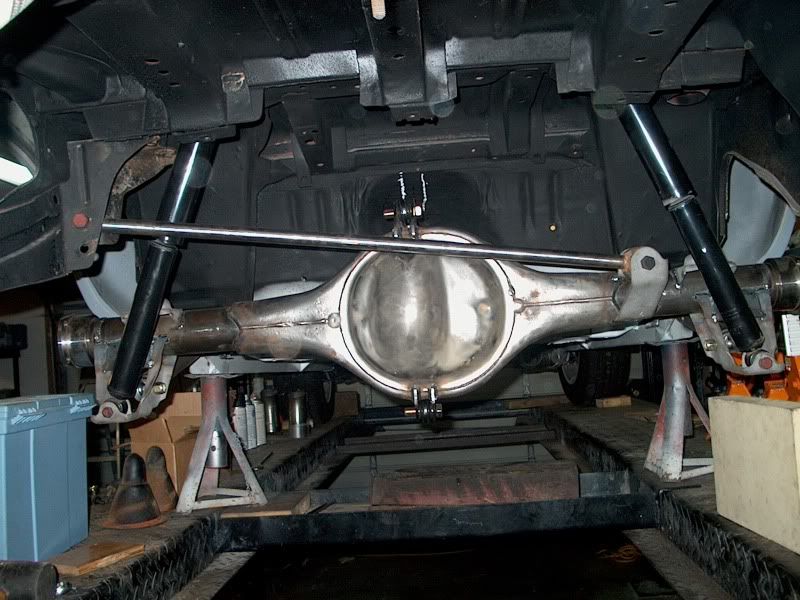
Suspension and rearend installed.
I discovered there was a problem at full compression with the torque arm mount hitting the tunnel. This could be a problem if you wanted to run a back seat. Personally I think my chances of convincing more than one person at once to get into this car with me when it is done are going to make one unnecessary!
Here is the finished relief for the torque arm and you can see the roll bar I have been working on. Definitely no back seat now!
I had to make a spacer so that the emergency brake would clear the torque arm mounting plate. You can see where I ran a bar from the cage to directly on top of the mounting plate itself.
Suspension and rearend installed.
80 Monza Cabriolet coupe
94 Corvette Convertible LT-1 500+ HP
Trailblazer EXT LS6 powered
1991 K1500 6.0 LS swapped
94 Corvette Convertible LT-1 500+ HP
Trailblazer EXT LS6 powered
1991 K1500 6.0 LS swapped
- Fastmax32168
- Posts: 945
- Joined: Mon Jun 26, 2006 7:56 am
- Location: Port Orange Fl
1977 Chevrolet Monza Mirage
Re: Fastmax's Mirage
![]() by chevy art » Mon Sep 12, 2011 12:01 am
by chevy art » Mon Sep 12, 2011 12:01 am
i can say only3 words nice nice and beautiful. i still saywe have the best fabricators and builders in the whole hot rod community, right here on our h-body forum. keep up the good work chevy art
- chevy art
- Posts: 1124
- Joined: Fri Feb 26, 2010 11:33 pm
Re: Fastmax's Mirage
![]() by Fastmax32168 » Sun Nov 13, 2011 6:50 pm
by Fastmax32168 » Sun Nov 13, 2011 6:50 pm
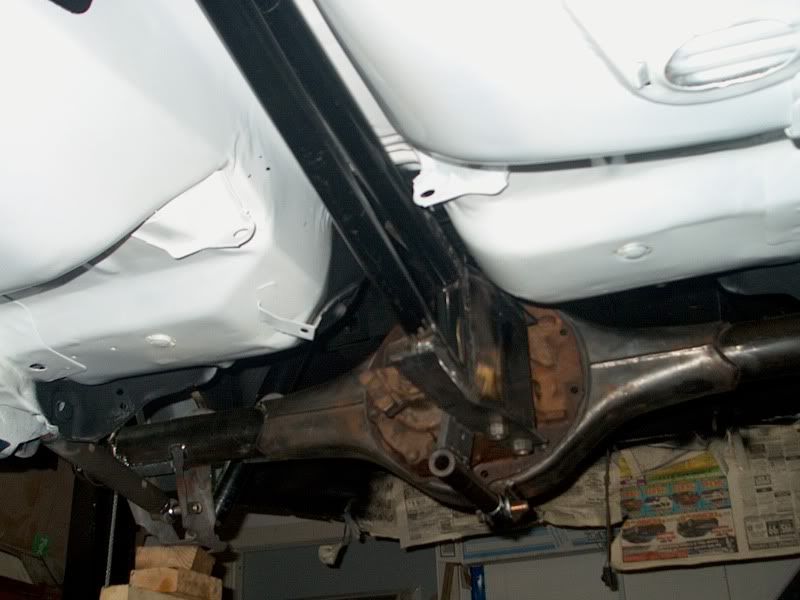
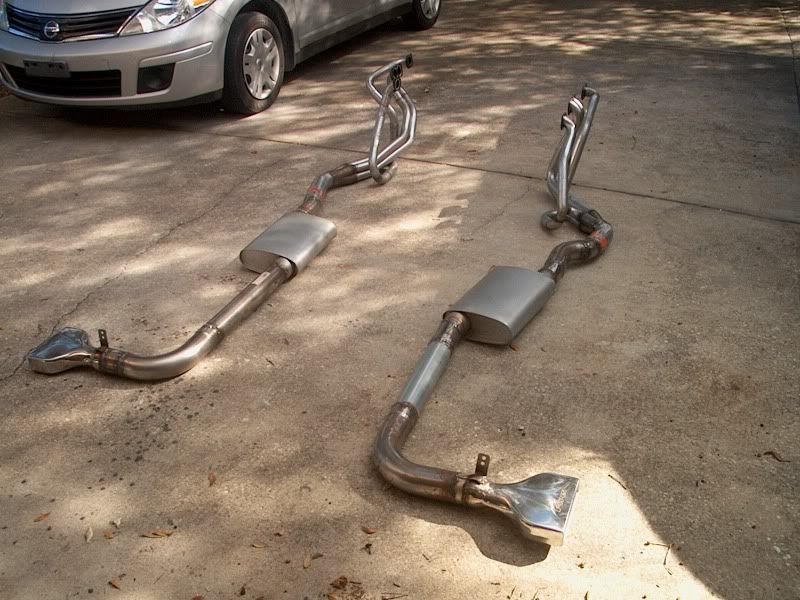
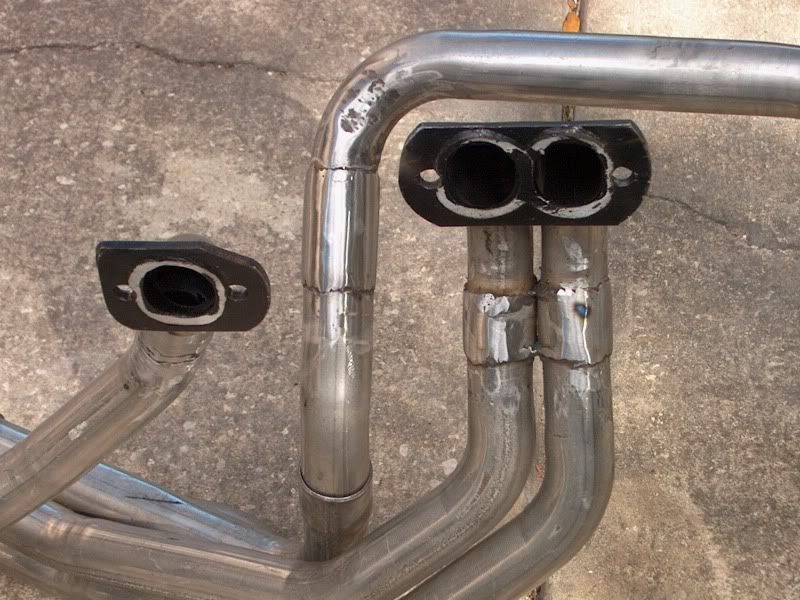
Here is the final pic on the installed 9 inch rear. Beefy!!!
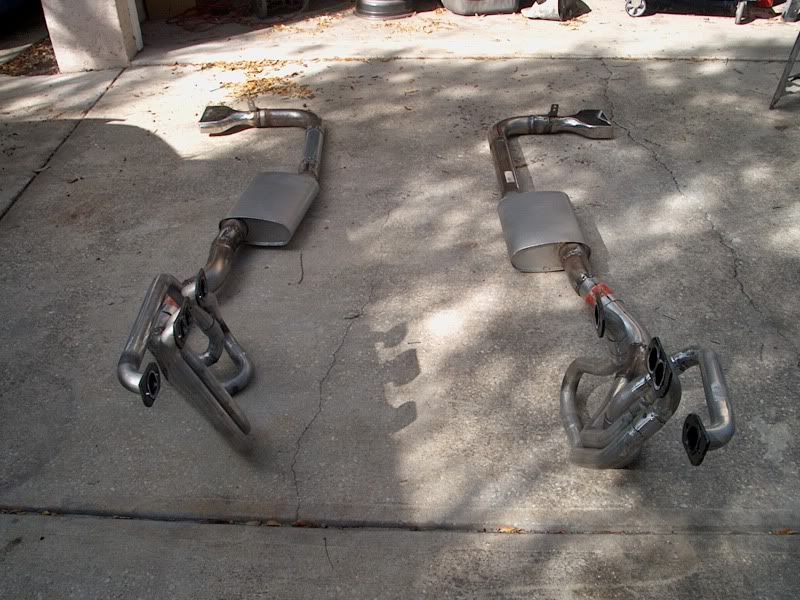
Now on to the the exhaust. What a nightmare. I could not get a set of headers that fit properly. At least not to my liking. I tried sandersons even though I knew the tubes would be way too small and the fit on them was terrible. I bought a set of unknowns off the internet and they didnt even come close to fitting. I started mocking up a set of homemades and decided it was going to take too long.
I finally anted up the big bucks and bought a new set of Don Hardys. I ended up making so many modifications, I think I should have stuck with plan B which was to build my own.
I did not want to put big dents into tubes, and I did not want to put big dents into the car anywhere that you could see. I wanted at least 3/8" clearance everywhere the header came near the body. When I first started these headers would not even bolt up they hit in so many places. I ended up heating, bending and making a few "flat" spots on multiple tubes just to get them on. Eventually I cut all the tubes on the drivers side and extended them about 1/2" while repositioning the tubes for more clearance. I cut off the factory header collectors and turned the tubes in so I could put an exhaust system onto them. I cut away part of the right lower subframe brace and rebuilt it so the header would clear where it came through the bottom.
Pretty dissappointing for a header that has been in production for so many years. Perhaps the Hardy mounts reposition the motor a bit lower in the frame, but I dont see how that would have changed a lot of the problems, and it certainly would not have helped it where it ran smack into the oil pan on the right side!
In the end I finally got what I wanted but it was a lot of work. Not a job for the mechanically challenged for sure.
Here they are ready to go off to the coating shop and be made pretty.
80 Monza Cabriolet coupe
94 Corvette Convertible LT-1 500+ HP
Trailblazer EXT LS6 powered
1991 K1500 6.0 LS swapped
94 Corvette Convertible LT-1 500+ HP
Trailblazer EXT LS6 powered
1991 K1500 6.0 LS swapped
- Fastmax32168
- Posts: 945
- Joined: Mon Jun 26, 2006 7:56 am
- Location: Port Orange Fl
1977 Chevrolet Monza Mirage
Re: Fastmax's Mirage
![]() by bigbro36 » Thu Mar 29, 2012 3:25 pm
by bigbro36 » Thu Mar 29, 2012 3:25 pm
any updates? Im thinking of doing the 9 inch setup. I was wondering why you went with the shorter torque arm...Thanks.
-

bigbro36 - Posts: 34
- Joined: Tue Jul 12, 2011 8:41 am
Re: Fastmax's Mirage
![]() by zeke » Thu Jan 01, 2015 11:41 am
by zeke » Thu Jan 01, 2015 11:41 am
Three great pages of Monza build! 
I really like your frame connectors, may have to copy that someday.
Nice garage and those automatic sanding wifes are indeed excellent!
I really like your frame connectors, may have to copy that someday.
Nice garage and those automatic sanding wifes are indeed excellent!
Chris
zeke's 79 Monza Project
zeke's 78 Sport Coupe
Photographs posted by this user (zeke) are the sole property of this poster. Any use without express written permission is prohibited
zeke's 79 Monza Project
zeke's 78 Sport Coupe
Photographs posted by this user (zeke) are the sole property of this poster. Any use without express written permission is prohibited
-

zeke - Posts: 2930
- Joined: Fri Jul 21, 2006 3:27 am
- Location: Southern Ontario, Canada
1979 Chevrolet Monza 2+2
42 posts
• Page 3 of 3 • 1, 2, 3
Who is online
Users browsing this forum: Google [Bot] and 36 guests