The Official H-Body Internet Community
Vega, Monza, Sunbird, Astre, Starfire, Skyhawk
VegaGT's 74 Vega Project
Moderator: Moderators
17 posts
• Page 1 of 2 • 1, 2
VegaGT's 74 Vega Project
![]() by VegaGT » Tue Dec 27, 2011 8:30 pm
by VegaGT » Tue Dec 27, 2011 8:30 pm
???
Last edited by VegaGT on Sun Dec 16, 2012 4:48 pm, edited 2 times in total.
Chris
Looking for a good one...
Looking for a good one...
-

VegaGT - Posts: 93
- Joined: Tue Nov 22, 2011 10:40 pm
- Location: Cedar Springs, Michigan
Re: VegaGT's 74 Vega Project
![]() by 76Vega » Tue Dec 27, 2011 10:52 pm
by 76Vega » Tue Dec 27, 2011 10:52 pm
Looks like you got your work cut out for you, good luck.
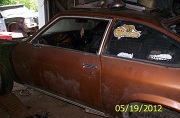
The one i just bought is really rusty (can't expect much from a $200.00 car.), It seems like everywhere i look i find fiberglass covering up rot holes, I'm going back to the garage i have it stored at tomorrow to finish up some more rust repairs, and i'll take some pics. and I'll start my own project thread as well.
The one i just bought is really rusty (can't expect much from a $200.00 car.), It seems like everywhere i look i find fiberglass covering up rot holes, I'm going back to the garage i have it stored at tomorrow to finish up some more rust repairs, and i'll take some pics. and I'll start my own project thread as well.
David
1972 Vega GT
1972 Vega GT
-
76Vega - Posts: 173
- Joined: Wed Dec 21, 2011 7:29 am
- Location: Allentown, Pennsylvania
1976 Chevrolet Vega
Re: VegaGT's 74 Vega Project
![]() by cjbiagi » Tue Dec 27, 2011 11:07 pm
by cjbiagi » Tue Dec 27, 2011 11:07 pm
Yeah, lot's of work there. Just remember that on a unibody car the sheet metal comprises much of the structural integrity. So, it's more than just a cosmetic repair. These cars aren't known for their strength to begin with and rust can really weaken them. Make your repairs with that in mind so you end up with a strong foundation to build upon. Not saying that to scare you away from repairing it, just as general info so that you can do it correctly.
Clyde.........75 Monza 2+2
-

cjbiagi - Posts: 8611
- Joined: Sun Jun 25, 2006 2:37 pm
- Location: Glenwood, Illinois
1975 Chevrolet Monza
Re: VegaGT's 74 Vega Project
![]() by VegaGT » Wed Dec 28, 2011 9:21 am
by VegaGT » Wed Dec 28, 2011 9:21 am
...
Last edited by VegaGT on Sun Dec 16, 2012 4:42 pm, edited 1 time in total.
Chris
Looking for a good one...
Looking for a good one...
-
VegaGT - Posts: 93
- Joined: Tue Nov 22, 2011 10:40 pm
- Location: Cedar Springs, Michigan
Re: VegaGT's 74 Vega Project
![]() by VegaGT » Sat Jan 14, 2012 10:16 pm
by VegaGT » Sat Jan 14, 2012 10:16 pm
...
Last edited by VegaGT on Sun Dec 16, 2012 4:46 pm, edited 1 time in total.
Chris
Looking for a good one...
Looking for a good one...
-
VegaGT - Posts: 93
- Joined: Tue Nov 22, 2011 10:40 pm
- Location: Cedar Springs, Michigan
Re: VegaGT's 74 Vega Project
![]() by VegaGT » Sun Jul 08, 2012 8:04 pm
by VegaGT » Sun Jul 08, 2012 8:04 pm
...
Last edited by VegaGT on Sun Dec 16, 2012 4:45 pm, edited 1 time in total.
Chris
Looking for a good one...
Looking for a good one...
-
VegaGT - Posts: 93
- Joined: Tue Nov 22, 2011 10:40 pm
- Location: Cedar Springs, Michigan
Re: VegaGT's 74 Vega Project
![]() by sirrick4 » Sun Jul 08, 2012 8:09 pm
by sirrick4 » Sun Jul 08, 2012 8:09 pm
Lookin good Chris. I admire your patience 
Rick ......1975 Monza 2+2
- sirrick4
- Posts: 305
- Joined: Sun Mar 13, 2011 6:32 am
- Location: Gympie, Queensland Australia
Re: VegaGT's 74 Vega Project
![]() by VegaGT » Sun Jul 22, 2012 9:17 am
by VegaGT » Sun Jul 22, 2012 9:17 am
...
Last edited by VegaGT on Sun Dec 16, 2012 4:45 pm, edited 1 time in total.
Chris
Looking for a good one...
Looking for a good one...
-
VegaGT - Posts: 93
- Joined: Tue Nov 22, 2011 10:40 pm
- Location: Cedar Springs, Michigan
Re: VegaGT's 74 Vega Project
![]() by VegaGT » Thu Aug 16, 2012 10:35 am
by VegaGT » Thu Aug 16, 2012 10:35 am
...
Last edited by VegaGT on Sun Dec 16, 2012 4:44 pm, edited 1 time in total.
Chris
Looking for a good one...
Looking for a good one...
-
VegaGT - Posts: 93
- Joined: Tue Nov 22, 2011 10:40 pm
- Location: Cedar Springs, Michigan
Re: VegaGT's 74 Vega Project
![]() by 76Vega » Thu Aug 16, 2012 11:25 am
by 76Vega » Thu Aug 16, 2012 11:25 am
My 76 was in the same condition and what i did first was repair the frame/inner rocker area then i took 3x3 3/16 box steel and ran it from the rear control arms up along the rockers and notched a hole in the frame and ran the new rails into it instead of up against it so it would be stronger, also took out the original lca brackets, and used 2x2 box to make new brackets and give extra clearance for exhaust etc. I was also able to keep it even with the lower lip so it didn't show from the out side of the car, I used 3x3 because it fit better in the rear section but 2x3 will do just fine and not stick up through the floor as much as mine did. Also the 3/16 was a little to thick.
Pics can be found here. bottom of page.
viewtopic.php?f=20&t=36102
Pics can be found here. bottom of page.
viewtopic.php?f=20&t=36102
David
1972 Vega GT
1972 Vega GT
-
76Vega - Posts: 173
- Joined: Wed Dec 21, 2011 7:29 am
- Location: Allentown, Pennsylvania
1976 Chevrolet Vega
Re: VegaGT's 74 Vega Project
![]() by VegaGT » Thu Aug 16, 2012 12:52 pm
by VegaGT » Thu Aug 16, 2012 12:52 pm
...
Last edited by VegaGT on Sun Dec 16, 2012 4:49 pm, edited 1 time in total.
Chris
Looking for a good one...
Looking for a good one...
-
VegaGT - Posts: 93
- Joined: Tue Nov 22, 2011 10:40 pm
- Location: Cedar Springs, Michigan
Re: VegaGT's 74 Vega Project
![]() by VegaGT » Fri Aug 17, 2012 8:14 pm
by VegaGT » Fri Aug 17, 2012 8:14 pm
...
Last edited by VegaGT on Sun Dec 16, 2012 4:50 pm, edited 1 time in total.
Chris
Looking for a good one...
Looking for a good one...
-
VegaGT - Posts: 93
- Joined: Tue Nov 22, 2011 10:40 pm
- Location: Cedar Springs, Michigan
Re: VegaGT's 74 Vega Project
![]() by VegaGT » Sun Sep 16, 2012 12:33 pm
by VegaGT » Sun Sep 16, 2012 12:33 pm
Last edited by VegaGT on Sun Dec 16, 2012 4:51 pm, edited 1 time in total.
Chris
Looking for a good one...
Looking for a good one...
-
VegaGT - Posts: 93
- Joined: Tue Nov 22, 2011 10:40 pm
- Location: Cedar Springs, Michigan
Re: VegaGT's 74 Vega Project
![]() by BadBowtie » Mon Sep 17, 2012 1:37 pm
by BadBowtie » Mon Sep 17, 2012 1:37 pm
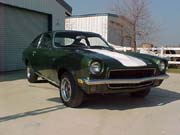
I really dig the early front end sheet metal, id be interested to see how you windup mounting the headlights.
James
1975 Vega GT sbc, Microsquirt w/Edelbrock MPFI, M21 4-speed and Ford 9"
1975 Vega GT sbc, Microsquirt w/Edelbrock MPFI, M21 4-speed and Ford 9"
-

BadBowtie - Posts: 846
- Joined: Wed Oct 28, 2009 12:20 am
1975 Chevrolet Vega GT
17 posts
• Page 1 of 2 • 1, 2
Who is online
Users browsing this forum: No registered users and 36 guests